5 Ways to Extend Your Small Beach Cottage Living Space for Seamless Indoor-Outdoor Flow
This post may contain affiliate links. If you make a purchase through one of my links, I may receive a small commission at no cost to you.
When I first stepped into my 800-square-foot beach cottage, I felt two things at once. I was completely enchanted by the coastal charm. But I was also overwhelmed by how tiny the space actually was. How could I possibly make this work for everyday living AND entertaining guests?
After experimenting with different layouts and design tricks, I finally figured it out. The secret to making a small beach cottage feel spacious isn't about knocking down walls or adding square footage. It's about blurring the lines between your indoor and outdoor spaces.
Today, my modest beach cottage feels like it's twice the size. The best part? Most of these changes don't require a big budget or major renovations.
I'm sharing everything I've learned about creating seamless indoor-outdoor flow in small beach cottages. These are the exact techniques that turned my cramped 800 square feet into a home that breathes, flows, and feels endlessly spacious.
Key Takeaways
Remove physical and visual barriers between indoor and outdoor spaces by creating flush thresholds and using continuous flooring materials that work in both environments
Choose multi-functional furniture that can easily move between inside and outside, expands for guests, and serves multiple purposes to maximize your limited square footage
Create weather-protected outdoor rooms with retractable awnings, outdoor curtains, and heating elements so you can use your outdoor space year-round in any conditions
Use mirrors and glass strategically to reflect views and natural light, making small spaces feel exponentially larger without any structural changes
Blur interior and exterior boundaries by repeating plants, natural materials, and coastal colors throughout both spaces for a cohesive, flowing aesthetic
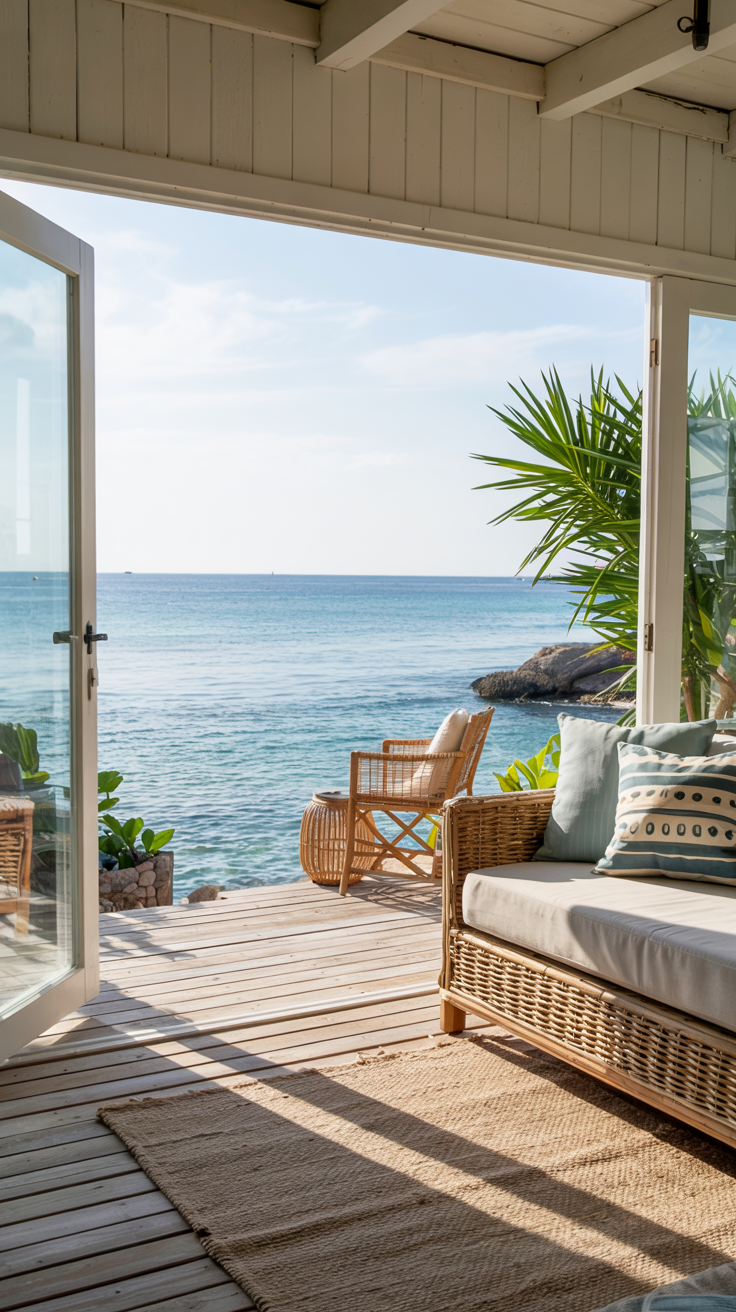
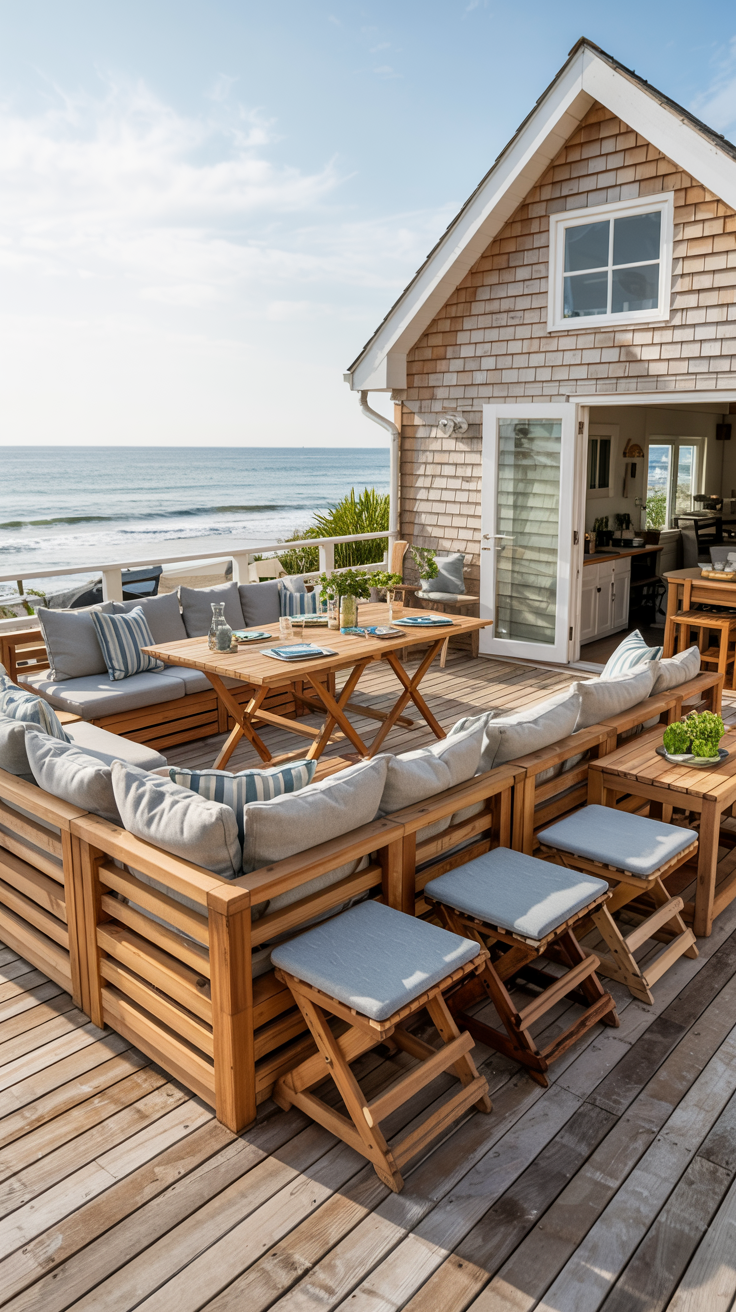
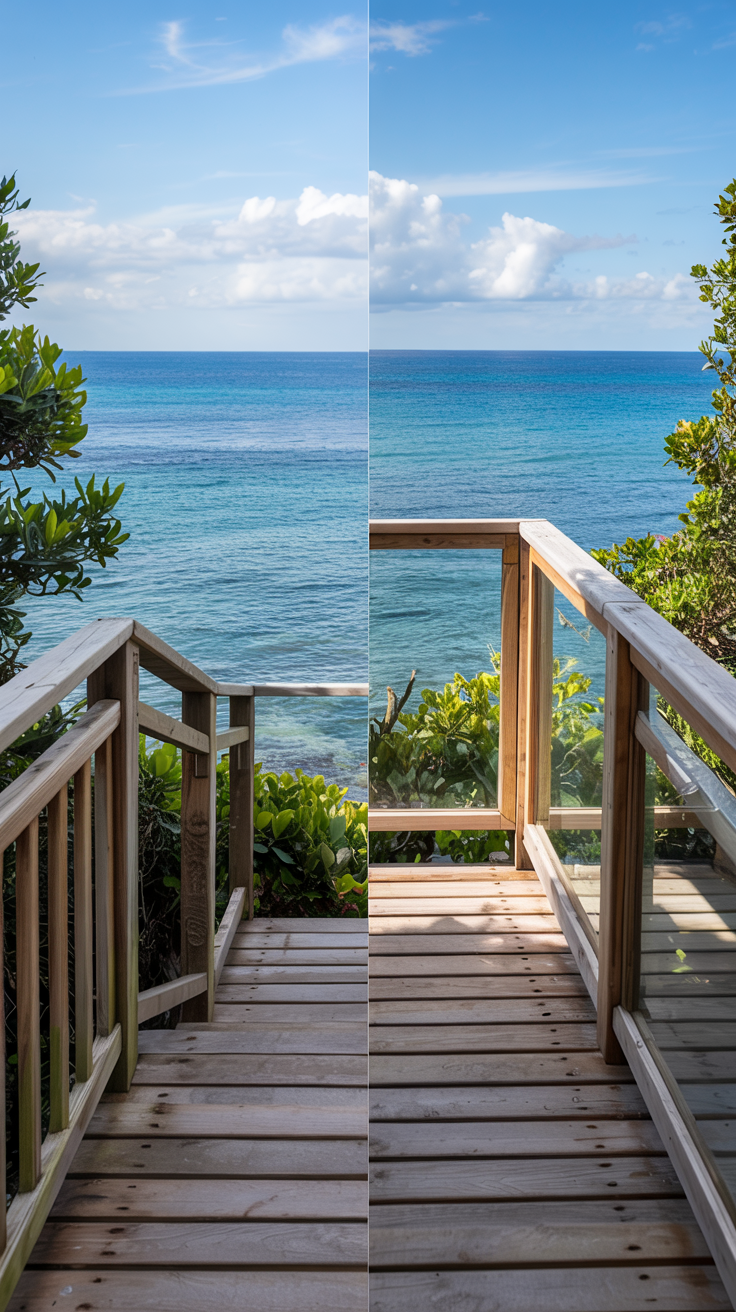
1. Create Seamless Indoor-Outdoor Transitions with Flush Thresholds
A seamless threshold transition eliminates the physical and visual barrier between your indoor and outdoor spaces. Instead of having a raised door frame, step, or different flooring materials that signal "you're going outside now," you create a smooth, continuous surface that flows from inside to out. When I installed mine, I made sure my living room floor and deck were at the exact same height with matching or complementary flooring materials. The goal is to make someone walk from your living room to your patio without even noticing they've crossed a boundary.
This single change had the biggest impact on how spacious my 800-square-foot cottage feels. That old 2-inch threshold wasn't just a tripping hazard. It was a mental barrier that made my outdoor space feel like a separate area instead of an extension of my living room. Once I eliminated it, my functional living space literally doubled. My friend Kate walked straight through last summer and didn't realize she'd gone outside until she felt the breeze. That's exactly the effect you want. It also makes moving furniture between spaces effortless, which is crucial when you're entertaining in a small cottage.
How to recreate or build it
Start by measuring the height difference between your indoor floor and outdoor surface. You'll need to either raise your outdoor deck or lower your interior threshold to make them flush. I chose to build up my deck slightly because it was easier than cutting into my floor joists.
First, remove your existing door and threshold completely. If you're raising your deck, add sleeper joists to bring it to the right height. Make sure you maintain proper drainage away from your house. Install your decking material right up to the door opening, leaving just enough gap for the door to swing freely (about 1/4 inch).
For the flooring itself, I used marine-grade composite decking both inside and outside my door. If you want to use different materials, choose ones in the same color family and finish. Install them so they meet in a perfectly straight line where your door closes. The key is that when your door is open, you see one continuous floor.
Replace your old door with one that opens completely. I found a secondhand French door where both panels swing open, giving me a 6-foot-wide opening. If you can afford it, pocket doors or sliding doors that disappear into the wall are even better.
What to buy or DIY
For a full DIY approach, I spent about $300 on my first attempt. I used pressure-treated decking from Home Depot painted in weatherproof porch paint (the same color as my interior floors). I bought a used French door on Facebook Marketplace for $75. I built a simple wooden ramp to eliminate the height difference and painted everything to match.
If you want to buy the best materials, invest in composite decking like Trex that mimics hardwood. It costs more upfront (around $8-12 per square foot) but lasts forever and needs almost no maintenance. For doors, a NanaWall system runs $3,000 to $8,000 but creates the most dramatic opening. A more affordable option is a good quality sliding door that can be fully opened, which you can find for $1,200 to $2,500.
You'll also need matching or complementary indoor-outdoor area rugs. I use Dash & Albert rugs that have survived three years of salt air without fading. They're pricey at $200 to $500 but worth it. For a budget option, outdoor rugs from HomeGoods work fine and cost $50 to $100.

Common mistakes to avoid
Don't make the mistake I made initially and assume any outdoor material will work inside. I first tried using standard deck boards indoors and they splintered like crazy when walked on barefoot. You need marine-grade or interior-rated materials for the indoor portion.
Also, never compromise on drainage. Your outdoor surface must slope away from your house, even if it means a tiny height difference right at the threshold. I learned this during my first rainstorm when water pooled at my door. A 1/8 inch per foot slope is enough and won't be noticeable visually.
The biggest mistake is thinking you need identical materials inside and out. You don't. You need harmonious materials. My interior oak floors and exterior composite decking aren't the same, but they're close enough in color that your eye reads them as continuous. Perfect matching will drive you crazy and blow your budget.
Don't forget to check local building codes. Some areas require a certain height difference between interior and exterior floors for water protection. You may need to get creative with drainage solutions to meet code while still achieving a visual flow.
How to take care of it
Maintenance is easier than you'd think. I sweep both my indoor and outdoor sections daily during beach season because sand gets everywhere. The composite decking outdoors just needs a good scrub with deck cleaner twice a year. I use Simple Green and a stiff brush.
The indoor portion gets treated like any interior floor. I use a damp mop weekly and reseal my painted surface once a year with weatherproof floor paint. This takes maybe an hour and keeps everything looking fresh.
Check the threshold area carefully after heavy rains. Look for any water infiltration or warping. I apply a bead of clear silicone caulk along the bottom of my door frame once a year as preventive maintenance. It takes 10 minutes and has prevented any water damage.
The door hardware gets more wear when you're opening it constantly, so I spray the hinges and tracks with WD-40 every few months. In the salt air, metal corrodes quickly if you neglect it. I also wipe down my glass doors weekly with vinegar solution to prevent salt buildup that can etch the glass permanently.
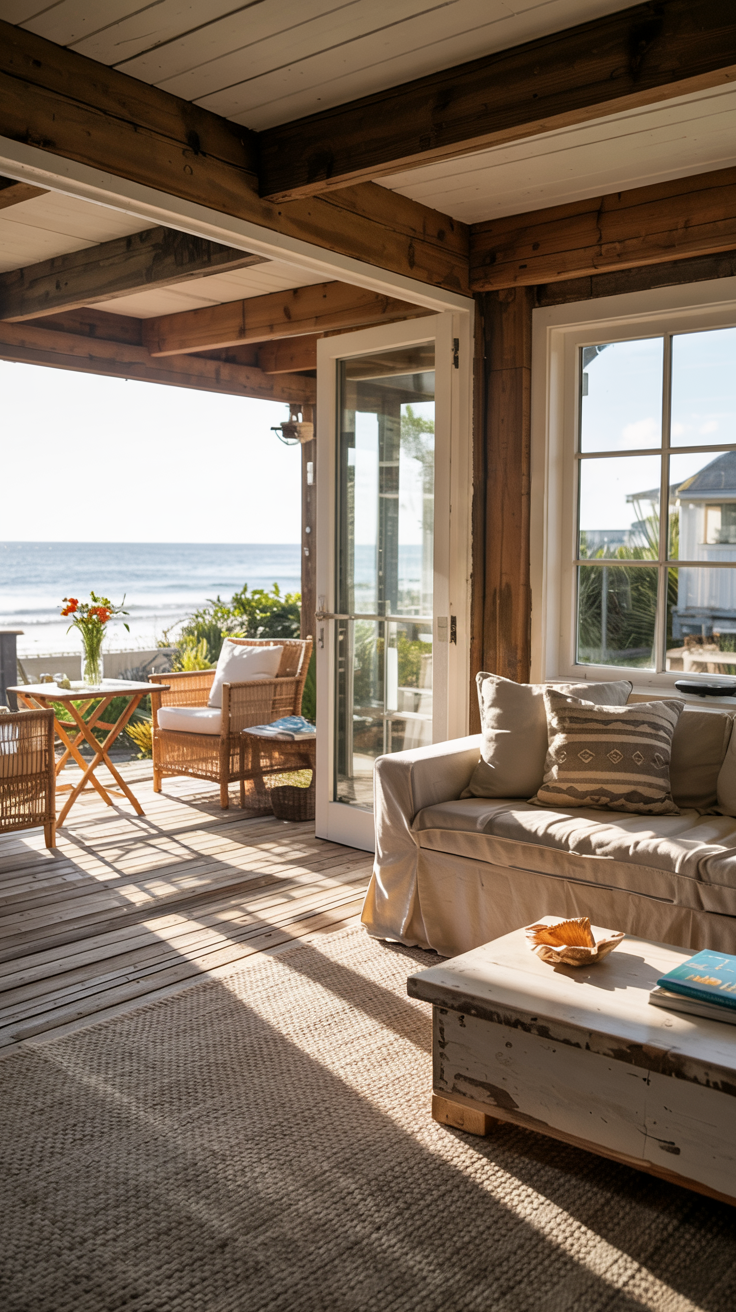
2. Multi-Functional Furniture That Maximizes Small Beach Cottage Space
Convertible furniture means pieces that can easily move between indoor and outdoor spaces, change configuration based on your needs, or serve multiple purposes. In my cottage, nothing has just one job. My dining table wheels from inside to the deck and expands to seat eight instead of four. My ottomans work as coffee tables, extra seating, or storage boxes. My folding screens provide privacy on windy days then disappear into a closet when not needed. Everything is lightweight, weather-resistant, and flexible enough to adapt to whatever I need that day.
When you only have 800 square feet, every piece of furniture needs to work overtime. I used to have separate indoor and outdoor furniture, which meant I could never seat more than six people total and half my storage space was taken up by seasonal items. Now I can host 14 people for dinner by moving and reconfiguring my furniture in about 15 minutes. The flexibility means I'm not locked into one furniture arrangement or stuck entertaining only in good weather. Last Fourth of July proved this works better than I ever imagined. I had dining, lounging, and fire pit seating all arranged perfectly, then everything packed away neatly by midnight.
How to recreate or build it
Start by taking inventory of your current furniture. What's lightweight enough to move easily? What could work in both environments if you added wheels or protective treatments? I began by adding casters to my coffee table and dining table. This $20 hardware store purchase changed everything.
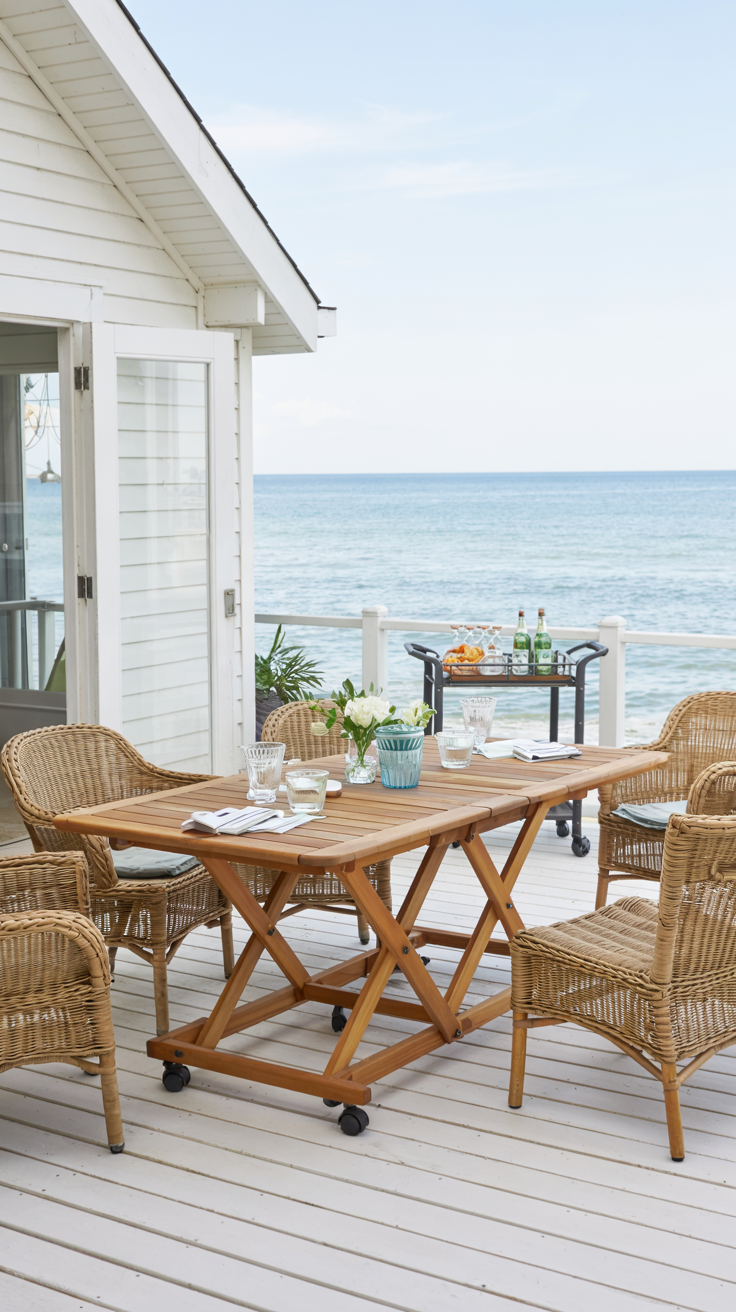
Look for furniture that can expand, fold, nest, or stack. My dining table has a butterfly leaf that lives underneath and pops up to double the surface. I found stackable chairs that look stylish (not like folding chairs) and nest together to take up barely any space. For seating, I chose modular outdoor pieces that can be arranged as a sofa, separate chairs, or a sectional depending on the day.
Material choice is critical. I learned to look for teak, aluminum, all-weather wicker, and marine-grade textiles. These materials handle both the comfort level you want indoors and the weather exposure they'll get outdoors. Avoid anything with tight upholstery that can't be removed. Slipcovers that you can take off and shake out are essential in a beach environment.
Add storage wherever possible. My coffee table opens up to store throw blankets. My ottomans hide cushions and outdoor pillows. The bench on my deck has a hinged seat with storage underneath for citronella candles and bug spray.
What to buy or DIY
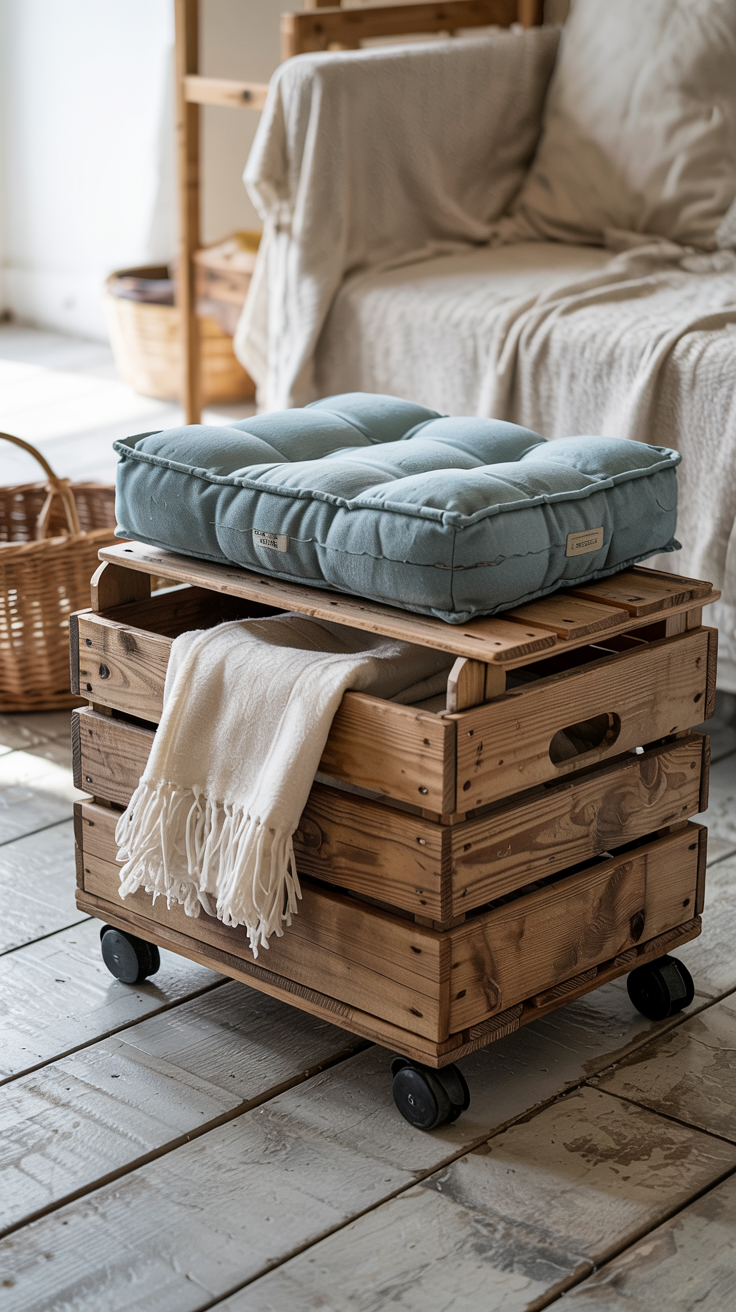
I made my favorite convertible piece for about $50. I found an old wooden crate at a yard sale, added heavy-duty casters on the bottom (the kind that lock), attached a hinged top, and made a cushion from foam and outdoor fabric. It serves as a coffee table, footrest, extra seat, and storage box. The outdoor fabric has faded after five years but still looks intentionally weathered.
For buying ready-made pieces, West Elm makes an expandable dining table with a marine-grade finish for around $800. It's survived three years on my deck without warping. IKEA's PS collection has folding chairs that hang flat on the wall for $30 each. I have six and they're holding up great.
A rolling bar cart (I got mine from Target for $120) is incredibly versatile. It holds drinks and snacks, wheels wherever you need it, and stores small items on the shelves. I also swear by modular outdoor seating. I bought a set from Article for $1,200 that can be configured at least eight different ways.
Storage ottomans with waterproof interiors are worth buying quality versions. I spent $200 each on two from Frontgate and they've been perfect. Cheap versions fall apart in one season.
Common mistakes to avoid
I wasted money on pure white furniture thinking it would look beachy and fresh. It was a disaster. Every grain of sand showed up, and the cushions looked dirty within a week no matter how much I cleaned them. Stick with sandy beiges, soft grays, and muted blues that hide the inevitable beach debris.
Don't buy furniture that's too heavy to move comfortably. If you need two people to move your coffee table, it's not convertible furniture no matter how pretty it is. I can move every piece in my cottage by myself, and that's the test.
Another mistake is thinking weatherproof means indestructible. I left my first set of "all-weather" cushions outside all winter and they molted. Even weather-resistant furniture needs to be brought inside or covered during harsh weather and off-season. I keep a large deck box for storing cushions overnight and during storms.
Don't forget about sun exposure. I positioned a beautiful teak bench in full afternoon sun and it dried out and cracked within six months. Even good outdoor furniture needs some shade or regular oiling to survive intense UV exposure.
How to take care of it
My maintenance routine is simple but consistent. Every evening, I shake out cushions and wipe down surfaces. Sand is abrasive and will wear down finishes if left to grind in. Once a week, I vacuum cushions with an upholstery attachment to get sand out of the crevices.
Monthly, I wash all removable cushion covers. I throw them in the washing machine on gentle cycle with mild detergent and air dry them. This keeps them fresh and prevents mildew in our humid climate.
Teak furniture gets oiled twice a year with teak oil. This takes about 30 minutes per piece and keeps the wood from drying out. If you prefer the silvery weathered look, you can skip this, but the furniture will last longer with oiling.
Metal furniture needs checking for rust, especially on the legs and joints. I inspect everything monthly and touch up any rust spots immediately with Rust-Oleum. Once rust starts in salt air, it spreads fast.
Before winter or rainy season, I bring all cushions inside and store them in a closet. I cover the furniture frames with breathable outdoor furniture covers. Don't use plastic tarps as they trap moisture and cause mildew. The fitted covers I bought from CoverStore run about $40 each and have lasted four years so far.
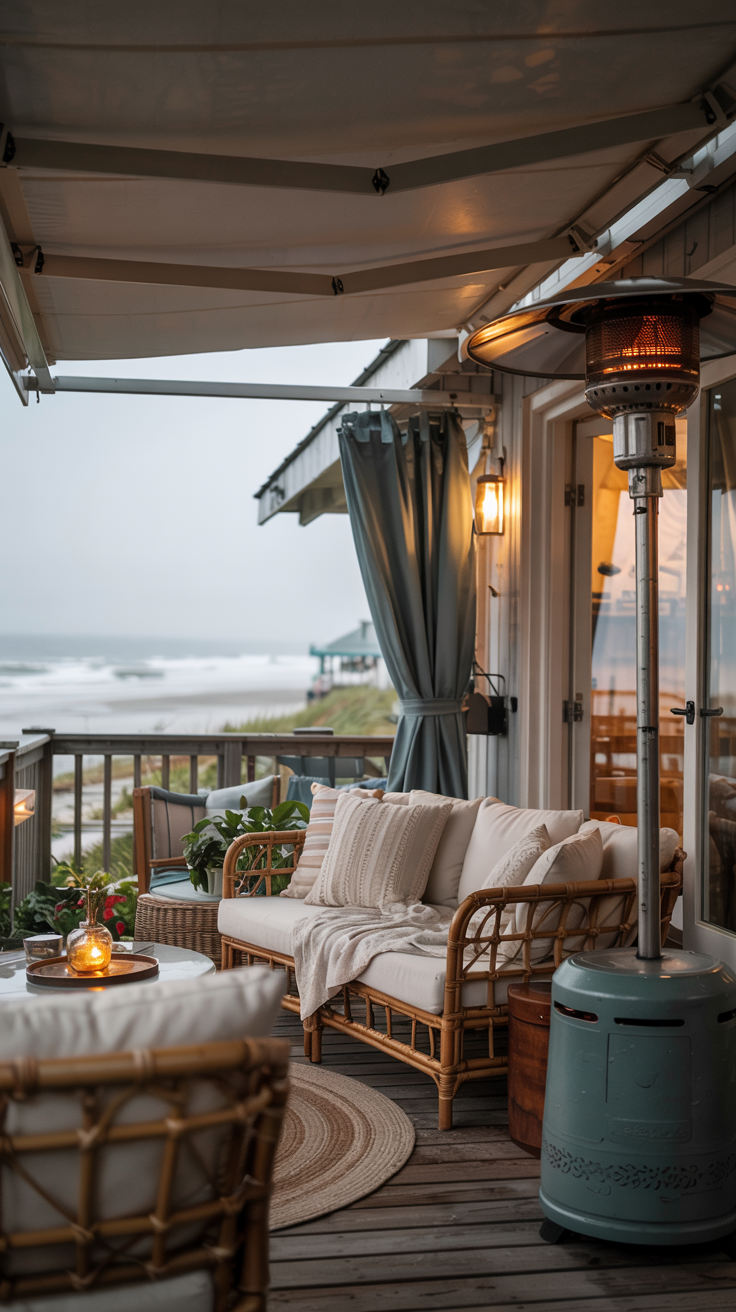
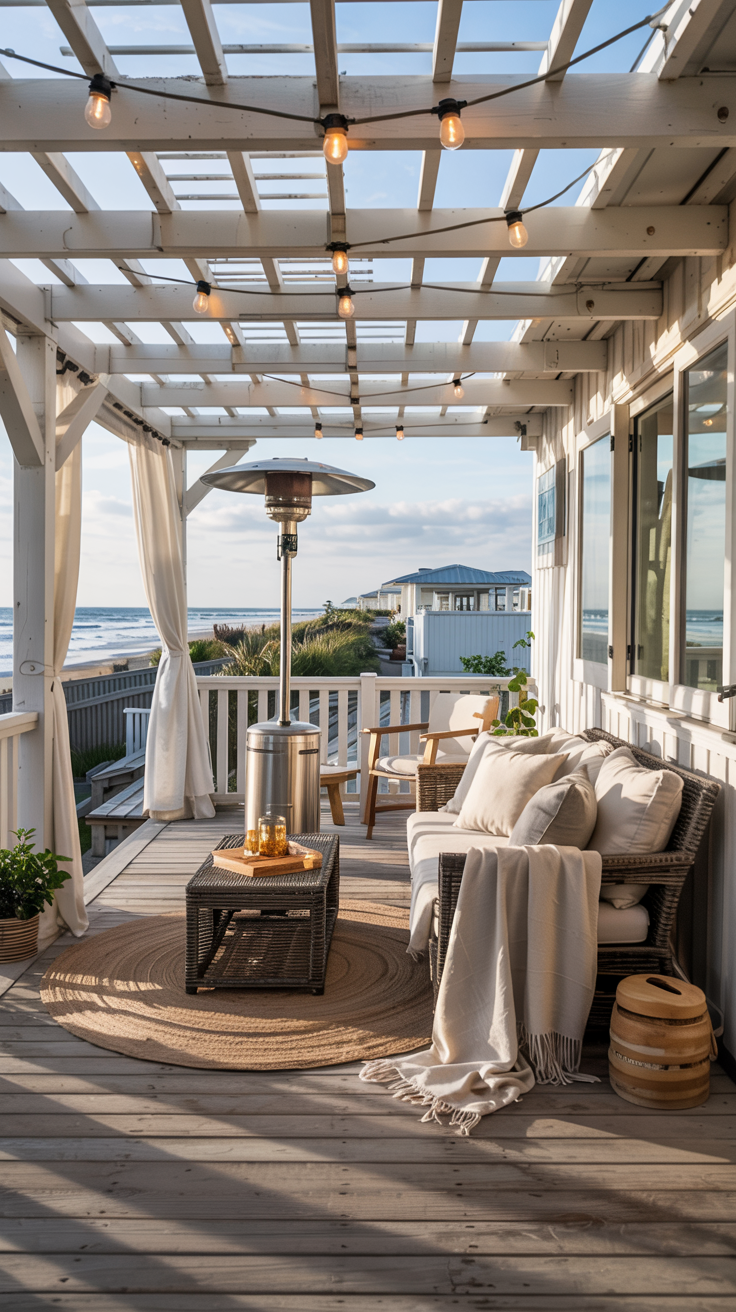
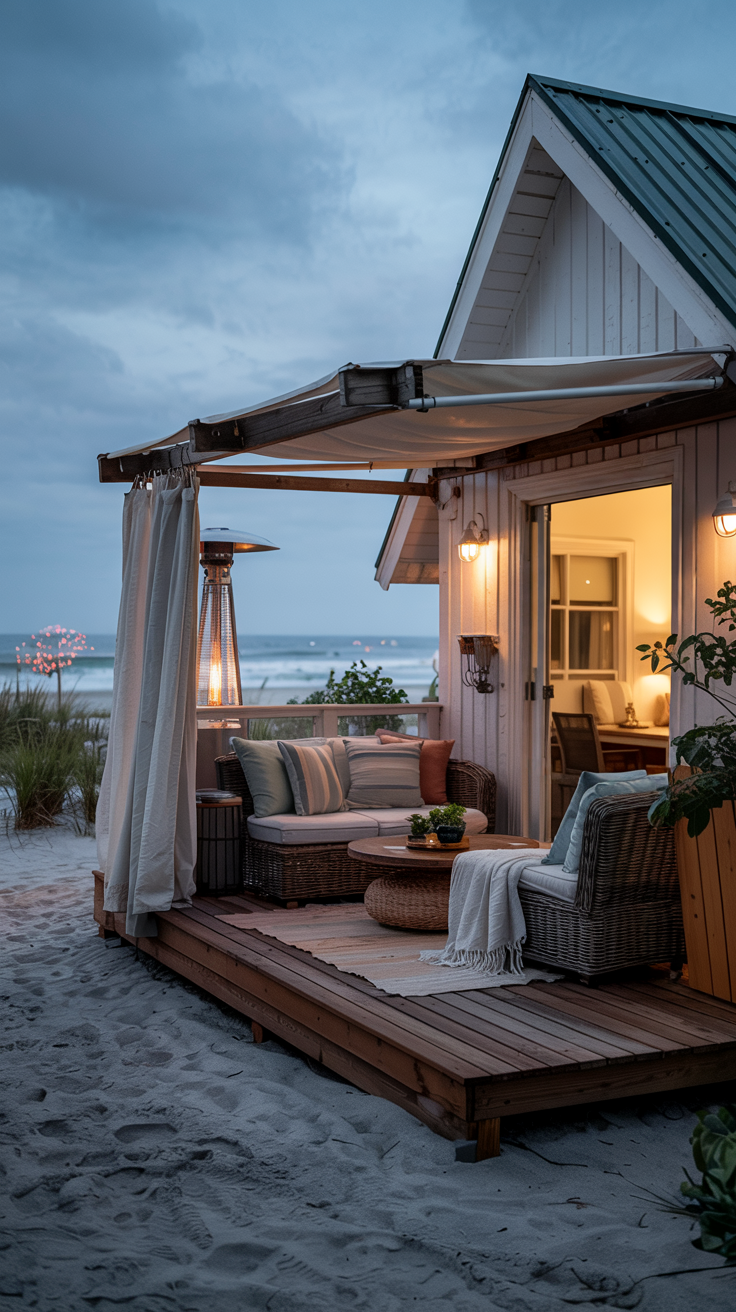
3. Design All-Weather Outdoor Rooms for Year-Round Coastal Living
A weather-adaptable outdoor room has protection from sun, wind, rain, and temperature extremes so you can use the space comfortably year-round. Mine includes a retractable awning for sun and rain coverage, outdoor curtains that I can close on windy days, a propane heater for chilly evenings, and proper drainage so everything dries quickly. The key word is adaptable. I can configure my space differently depending on whether it's a sunny afternoon, a breezy evening, or a drizzly morning. The space works with the weather instead of being shut down by it.
My outdoor deck would be useless for half the year without weather protection. Between intense sun, unexpected rain showers, wind that whips papers off the table, and chilly evenings, I'd get maybe four months of use out of an unprotected space. Now I use my deck almost daily, even in winter. The ability to adapt means I don't have to cancel plans or cram everyone inside my tiny living room when the weather isn't perfect.
How to recreate or build it
Start with overhead coverage. You need something flexible, not a permanent roof that blocks all light and makes the space feel closed in. I installed a retractable awning that extends when I need shade or rain protection and retracts to let in sun. Mount it to your exterior wall following the manufacturer's instructions. Make sure it's rated for your wind zone. Coastal areas need much sturdier hardware than inland locations.
Add side protection for wind and privacy. I hung outdoor curtain rods on two sides of my deck using heavy-duty brackets mounted into the exterior wall studs. The curtains slide open and closed as needed. For a temporary solution, you can use tension rods between posts.
Include a heat source. I chose a freestanding propane patio heater that I can move around. Position it away from your awning and curtains. If you have the budget and proper ventilation, a permanent outdoor fireplace or fire pit is even better for ambiance.
Make sure your deck has proper drainage. The surface should slope very slightly away from your house. Add gaps between deck boards for water to drain through. If you have a covered area, install gutters to channel water away rather than letting it sheet off the edge.
Layer your lighting. I have string lights overhead for ambiance, solar pathway lights around the perimeter for safety, and a couple of rechargeable lanterns I can move around as needed. Everything should be dimmable or on different switches so you can adjust for different times of day.
What to buy or DIY
My first weather protection was completely DIY and cost under $400. I made a sail shade using marine canvas from a fabric store and galvanized pipes from the hardware store. I measured carefully, sewed the canvas with heavy-duty thread, and attached grommets for the mounting points. The pipes bolted into my exterior wall studs. For curtains, I bought painter's drop cloths and treated them with waterproofing spray. I hemmed them and added grommets at the top to slide onto outdoor curtain rods. This setup lasted three years before I upgraded.
When I could afford it, I bought a SunSetter retractable awning with a wind sensor. This cost $1,500 installed and has been worth every penny. It automatically retracts if wind gets too strong, preventing damage. The manual override lets me extend it even in light rain.
For outdoor curtains, I now use Nicetown outdoor curtain panels from Amazon. They're about $35 per panel and have held up beautifully for two years. They're treated to resist fading and mildew. I needed eight panels to cover my two open sides.
The propane patio heater I bought from Home Depot for $200. It has an automatic shutoff if it tips over, which is essential for safety. I go through about one propane tank per month during cooler weather.
For deck tiles, I used Handy Home Depot's composite interlocking tiles at $4 per square foot. They snap together over my old concrete patio and drain perfectly. You can remove them if needed.
Common mistakes to avoid
Don't cheap out on hardware and mounting. My first awning ripped right off the wall during a storm because I used regular screws instead of lag bolts into studs. Coastal wind is no joke. Always use stainless steel hardware rated for marine environments or it will rust within months.
I learned the hard way not to leave my awning extended overnight or when I'm away from home. Wind can come up suddenly and destroy it. The motorized version with a wind sensor solved this problem. If you get a manual one, be disciplined about retracting it.
Never use regular indoor fabrics for outdoor curtains, even if they're under a covered area. I tried this first with some pretty Ikea curtains and they molted within six weeks. The sun and humidity destroyed them. Only use fabrics specifically rated for outdoor use.
Don't position your heater too close to any fabric, wood, or combustible materials. I keep mine at least three feet away from everything. Also, never use an indoor heater outside or an outdoor heater inside. They're designed differently for safety reasons.
The biggest mistake is assuming weather-resistant means waterproof. My cushions are weather-resistant, which means they can handle some moisture but shouldn't be left out in a downpour. I bring them inside or into storage during heavy rain.
How to take care of it
Maintenance starts with regular cleaning. I sweep my deck daily to remove debris that can trap moisture. Once a week, I hose everything down and wipe surfaces with a mild cleaner. Salt buildup happens fast near the ocean and can corrode metal and damage fabrics.
The awning gets wiped down monthly with a soft brush and soapy water. I never use harsh chemicals that can damage the waterproof coating. Twice a year, I do a thorough cleaning and check all the mechanical parts to make sure everything moves smoothly. I spray the moving parts with silicone lubricant.
Outdoor curtains go in the washing machine twice a season. I use cold water and mild detergent, then air dry them. This prevents mildew and keeps them looking fresh. Between washes, I shake them out weekly to remove dust and pollen.
The propane heater gets inspected before each season. I check the connections for leaks using soapy water (bubbles indicate a leak). I wipe down the exterior and make sure the ignition system works properly. Store propane tanks outside in a ventilated area, never in an enclosed space.
Before winter, I retract and secure my awning. I take down and wash the curtains and store them inside. I cover my heater with a breathable cover and disconnect the propane. I double-check that all drainage is clear so water doesn't pool and freeze.
After storms, I inspect everything for damage. Check that the awning didn't get stressed, look for tears in fabric, make sure mounting hardware is still secure. Catching small problems early prevents expensive repairs later.
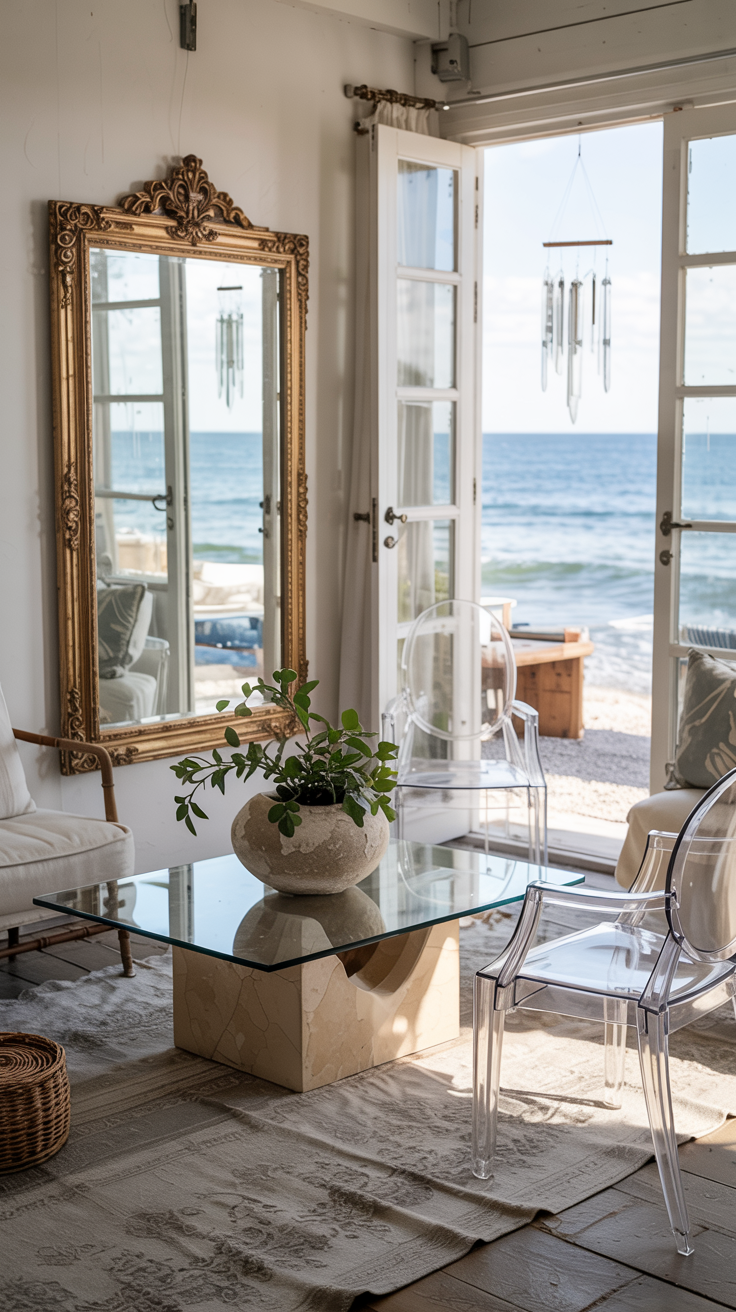
4. Make Small Spaces Feel Larger with Mirrors and Glass Elements
Strategic mirrors and glass create the illusion that your space is larger by reflecting light, views, and surrounding environment. I hung a large mirror directly opposite my sliding glass doors so it reflects the ocean view, making it seem like water surrounds my cottage on multiple sides. I replaced my solid deck railing with glass panels so the view isn't interrupted. I added mirrored planters that reflect the sky. I chose furniture with glass or lucite elements that visually disappear. All of these tricks use reflection and transparency to dissolve boundaries and make spaces feel expansive rather than confined.
The first mirror I hung literally made me gasp at the transformation. My living room instantly felt twice as large. The reflected ocean view wrapped around the space, bringing more light and nature inside. This costs less than almost any other renovation and has bigger impact than painting or buying new furniture. Mirrors also multiply your light sources. At sunset, the golden glow bounces between my glass doors and mirrors, filling the entire cottage with warm light. It's not just about size. It's about creating an airy, open feeling that makes you want to spend time in the space.

How to recreate or build it
Start by identifying your best views and natural light sources. These are what you want to reflect and multiply. Hang large mirrors directly opposite windows or glass doors to reflect outdoor views. The mirror should be big enough to capture the whole view. I used a 4-foot by 6-foot mirror opposite my main sliding door.
Position mirrors where they'll catch and bounce natural light around the room. A mirror on the wall perpendicular to a window will reflect light deeper into the space. Experiment with placement before permanently mounting anything. I used Command strips to test positions for a week before drilling holes.
Replace solid barriers with glass wherever possible. I swapped my wooden deck railing for glass panels. This was the single most expensive upgrade but had tremendous impact. The uninterrupted view makes my small deck feel much larger. For interior spaces, consider glass or lucite furniture that lets light pass through rather than blocking it.
Add reflective objects strategically outdoors. I use stainless steel and mirrored planters that reflect the sky and plants. Even metallic wind chimes and chrome hardware add little reflective moments that enhance the feeling of space.
Keep window treatments minimal. Heavy curtains block views and light. I use simple white roller shades that can be fully raised to disappear during the day. At night, they provide privacy without adding visual weight.
What to buy or DIY
For a DIY outdoor mirror feature, I created something special for about $75. I found an old window frame at an architectural salvage yard for $25. I took it to a glass shop and had them cut mirrors to fit the panes for $40. I sealed all the edges thoroughly with marine varnish and mounted it on my exterior cottage wall with heavy-duty brackets. Four years later, it still looks magical reflecting my container garden.
For buying ready-made, outdoor-rated mirrors with protective coatings run $200 to $500 depending on size. I found mine at Pottery Barn. They have a special coating that resists salt air corrosion. Don't use regular mirrors outside because moisture will get behind the silvering and ruin them quickly.
Glass deck railings cost significantly more. I paid $150 per linear foot installed, so my 20-foot railing ran $3,000. Cable railing systems are a cheaper alternative at $50 to $80 per foot and still preserve views better than solid railings.
For furniture, I bought a glass-topped outdoor dining table from Wayfair for $400. It looks invisible from certain angles and makes my deck feel much larger. Lucite accent chairs run $150 to $300 each. I have two flanking my front door.
Large interior mirrors are surprisingly affordable. I got my 4x6 foot mirror at Home Goods for $150. Just make sure it's mounted securely with appropriate hardware for the weight.
Common mistakes to avoid
Mirrors outdoors need different care than indoor ones. I learned this when my first outdoor mirror developed dark spots within months. Salt spray creates corrosion fast. You must use marine-rated mirrors with protective coatings or seal the backs of regular mirrors with marine varnish before hanging outside.
Position outdoor mirrors carefully to avoid creating hot spots that could damage plants or create uncomfortable glare. I accidentally fried a row of impatiens before I figured this out. The mirror was reflecting concentrated afternoon sun directly onto them. Angle mirrors to reflect sky and views, not direct sunlight.
Don't hang mirrors where they create awkward reflections. I initially positioned a mirror that reflected straight into my bathroom. It felt weird seeing that view from my living room. Walk around your space and check what the mirror shows from different angles before mounting permanently.
Glass furniture scratches easily. I learned to use placemats and coasters religiously. I also keep furniture wax on hand to buff out minor scratches. Tempered glass is worth the extra cost because it's much stronger and safer if it does break.
Never hang heavy mirrors with just picture hooks. I use heavy-duty wall anchors or mount into studs. A large mirror falling is dangerous and the repair is expensive. Budget $20 to $30 for proper mounting hardware.
How to take care of it
Outdoor mirrors need frequent cleaning in coastal areas. Salt spray creates spots incredibly fast. I keep a spray bottle of half vinegar and half water handy and wipe down my outdoor mirrors weekly. This takes maybe five minutes and prevents permanent etching.
For stubborn spots, I use a paste of baking soda and water applied with a soft cloth. Never use abrasive cleaners or rough scrubbing pads on mirrors. They'll scratch the reflective coating.
Interior mirrors need less maintenance but still benefit from regular cleaning. I use glass cleaner monthly and microfiber cloths to avoid streaks. I check the backing annually for any signs of deterioration, especially if the mirror is near a bathroom or kitchen where humidity is higher.
Glass deck railings need cleaning every week or two. I use the same vinegar solution I use on mirrors. After cleaning, I dry with a squeegee to prevent water spots. Bird droppings should be cleaned off immediately because they can etch glass.
Glass tabletops need daily wiping in beach environments. Sand is incredibly abrasive. I sweep or vacuum the glass before wiping it down to avoid scratching. I use glass cleaner and always dry thoroughly to prevent water spots.
Check mounting hardware every few months. Salt air corrodes metal fasteners and brackets. Tighten any loose screws and replace any hardware that shows rust. I keep spare stainless steel hardware on hand for quick fixes.
After storms, inspect mirrors and glass for any cracks or damage. Check that outdoor mirrors are still securely mounted. Coastal weather is tough on everything, so regular inspections catch problems before they become dangerous or expensive.
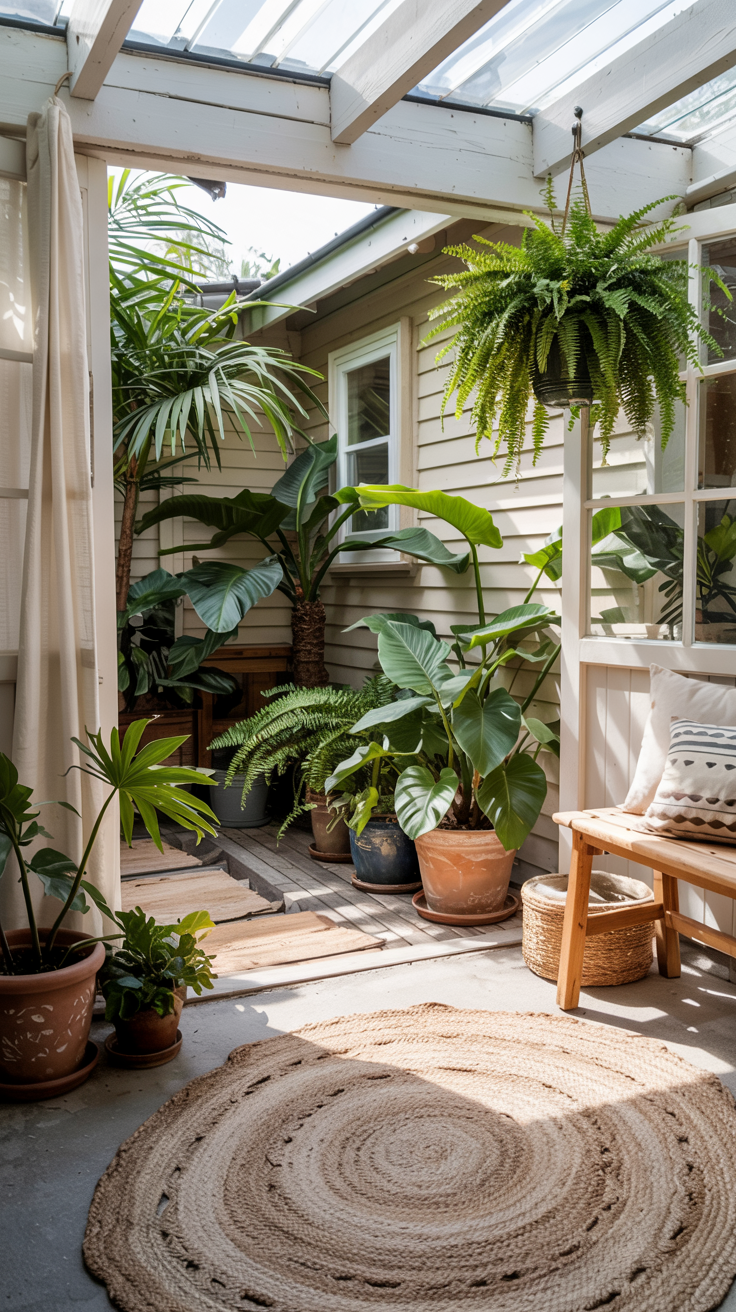
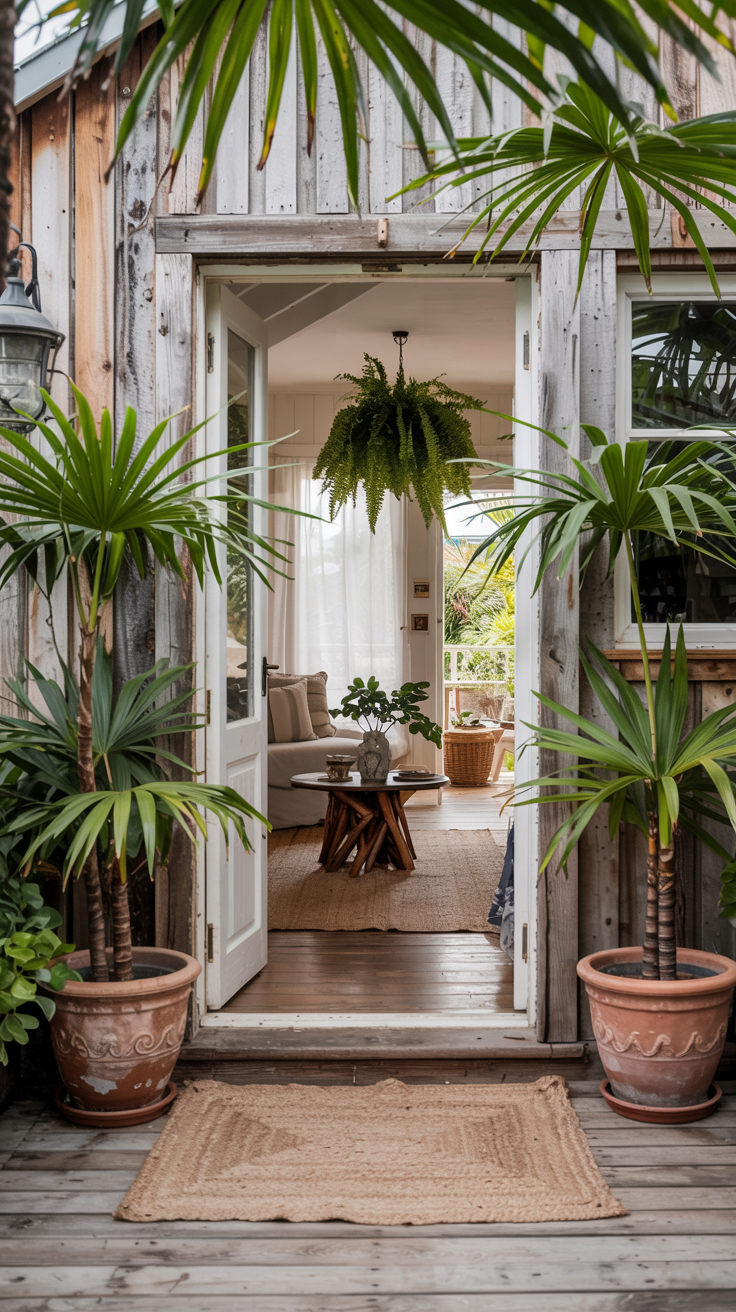
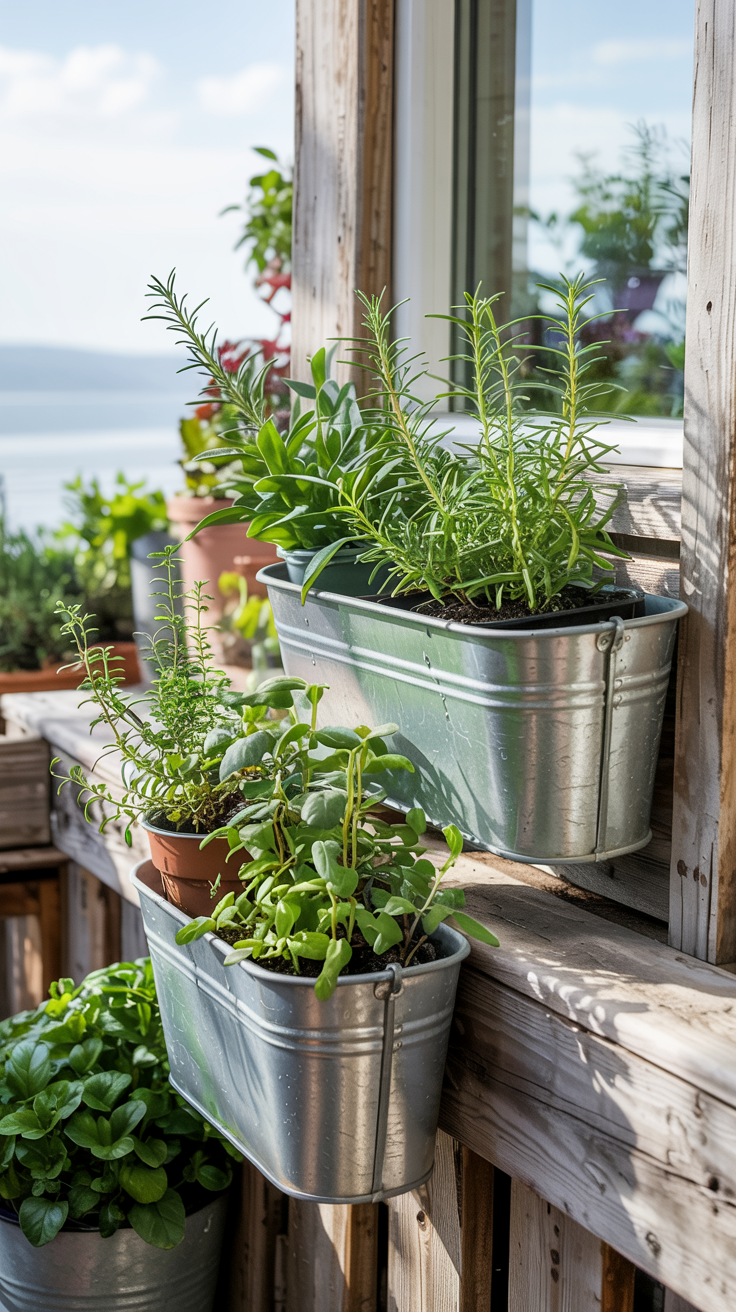
5. Blend Indoor and Outdoor Spaces with Plants and Natural Elements
This idea creates continuity between your interior and exterior by using plants, natural materials, colors, and textures that flow seamlessly from inside to out.
I have potted palms inside that mirror the plantings just outside my door. The jute rug in my living room echoes the sisal mat on my deck. My collection of driftwood, shells, and sea glass appears in both spaces. The colors in my throw pillows match the hydrangeas and sea grasses surrounding my cottage. Instead of decorated "interior" and landscaped "exterior," I've created one continuous environment where nature is present everywhere.
Beyond aesthetics, surrounding yourself with nature both inside and out creates a sense of calm. Studies show that plants reduce stress and improve air quality.
In my tiny cottage, this strategy brings the restorative qualities of the outdoors inside without sacrificing precious floor space.
How to recreate or build it
Start by choosing plants that thrive in coastal environments. Not everything loves salt air. I've had the best success with snake plants, ZZ plants, pothos, and spider plants indoors. Outside, I use native grasses, succulents, lavender, and rosemary. The key is picking plants with similar care requirements so maintenance doesn't become overwhelming.
Use matching or very similar containers throughout your space. I found that terra cotta works beautifully both indoors and out. It's affordable, available everywhere, and the natural color complements a beach aesthetic. I have the same size pots indoors on my windowsill and outdoors lining my deck.
Position larger plants near transition areas to create natural, organic boundaries. I have a big fiddle leaf fig just inside my sliding door and a matching potted palm just outside. Your eye connects them and reads the spaces as continuous.
Bring natural elements inside. I collect driftwood, interesting stones, and shells during beach walks and display them in bowls, use them as bookends, or incorporate them into practical items like lamp bases. These same elements appear on my deck railing and in my outdoor centerpieces.
Echo your outdoor color palette in your indoor textiles and accessories. My deck is surrounded by blue hydrangeas and silvery-green sea grasses. My indoor throw pillows, blanket, and artwork pick up these exact colors. When you look from inside to out, the colors flow together.
Use the same mulch or decorative stones in all planters, both inside and out. This tiny detail creates subtle cohesion. I use white pebbles as top dressing in every pot I own.
What to buy or DIY
My favorite DIY project cost less than $40 and provides both beauty and function. I created matching herb gardens using sections of rain gutter painted white. I cut the gutter into 3-foot lengths, added end caps, drilled drainage holes in the bottom, and mounted them on my kitchen windowsill and deck railing. I planted the same herbs in both rosemary, thyme, basil, and sage. The visual connection is strong and I can grab fresh herbs whether I'm cooking inside or grilling outside.
For buying plants, I've learned to invest in quality pots rather than cheap plastic ones that crack after one season. West Elm has beautiful fiber-clay planters that look like concrete but are lightweight and frost-resistant. They run $40 to $100 depending on size. I have six in various sizes and they all match.
Self-watering planters from IKEA make maintenance much easier. They're affordable at $15 to $30 and prevent that panicked watering situation when you realize you've neglected your plants all week. I use them exclusively for my indoor plants now.
For outdoor plants, I buy from local nurseries that carry varieties adapted to coastal conditions. Big box store plants often can't handle salt air. I learned this after killing $200 worth of Home Depot plants my first summer.
Preserved moss wall panels make a beautiful indoor accent and require zero maintenance. You can get a 12x12 inch panel for $30 to $50. I have one in my living room that adds texture and nature without needing care.
Common mistakes to avoid
I killed so many plants before I learned that salt air is tough on most species. Don't assume that because something grows well inland it will survive at the beach. I wasted money on ferns, hibiscus, and other plants that shriveled within weeks. Stick with slightly succulent varieties that can handle occasional salt spray. Ask local nurseries what they recommend rather than trusting general gardening advice.
Don't put plants in containers without drainage holes. I tried this with some pretty decorative pots and the root rot was brutal. Every container needs drainage. If you love a pot without holes, use it as a cachepot. Put your plant in a plastic pot with drainage and set that inside the decorative one.
Matching every single plant and container exactly looks forced and unnatural. I initially tried to have identical plants in identical pots and it felt like a furniture showroom. Instead, create harmony through similar colors, textures, and styles. Vary the sizes and specific plant varieties for a more organic look.
The biggest mistake is choosing high-maintenance plants when you're busy. I love orchids but I've killed every single one I've tried to keep. Stick with hardy plants that forgive occasional neglect. Snake plants and ZZ plants can go weeks without water and still look good.
Don't forget that plants near doors and windows will get different light and temperature than those deeper in your rooms. I position my neediest plants in prime spots and put my toughest plants in challenging locations.
How to take care of it
My plant care routine is simple because I chose low-maintenance varieties. I water indoor plants once a week, outdoor plants twice a week during summer. I check soil moisture with my finger before watering. If the top inch is still damp, I skip watering.
Every few months, I wipe down leaves on indoor plants with a damp cloth. This removes dust and helps them photosynthesize better. It also lets me check for pests early. Salt air means I see less pest problems than friends who live inland, which is a nice bonus.
I fertilize with liquid fertilizer once a month during growing season (spring through early fall). I don't fertilize in winter when growth slows. I mix the fertilizer at half the recommended strength because I've found full strength can burn roots in containers.
Outdoor plants get a light spray with the hose weekly to remove salt buildup on leaves. This is essential near the ocean. I do this early in the morning so leaves can dry before the intense midday sun.
I deadhead flowers and trim dead leaves as soon as I notice them. This takes just a minute or two when I'm outside with my morning coffee and keeps everything looking tidy. It also prevents disease from spreading.
Repot plants when they become rootbound, usually every two to three years for most varieties. I check by gently removing the plant from its pot. If roots are circling densely, it's time for a bigger home. I typically go up one pot size when repotting.
Natural elements like driftwood and shells need occasional dusting but otherwise require no maintenance. I spray them with water if they look dusty and let them air dry. The weathering they develop over time adds to their character.
Before winter, I bring my most tender plants inside or into a protected area. I cut back outdoor perennials and add mulch for insulation. Even in relatively mild coastal climates, protection helps plants survive dormant season and come back strong in spring.
Start Extending Your Small Beach Cottage Living Space Today
My 800-square-foot beach cottage now feels twice its size. The difference? These five indoor-outdoor flow strategies that transformed how I live in my small coastal space.
You don't need a huge budget or major renovations to make this work. Start with one strategy that fits your budget. Create seamless thresholds with flush flooring. Add convertible furniture that moves easily between spaces. Install weather protection for year-round use. Hang mirrors to multiply your views. Or bring plants and natural elements throughout.
Pick one technique and implement it this weekend. Then add another next month. I started with a simple DIY threshold fix for under $300. Five years later, I regularly host 14 people in a space where I once struggled to entertain two guests.
Your small beach cottage can become the spacious seaside retreat you've been dreaming about. Stop fighting your square footage and start blurring those indoor-outdoor boundaries instead.
Top 5 Space-Maximizing Techniques for Your Small Coastal Yard
Frequently Asked Questions About Beach Cottage Indoor-Outdoor Living
How can I make my small beach cottage feel bigger without renovating?
The easiest way is to create seamless transitions between your indoor and outdoor spaces. Remove visual barriers by using matching flooring materials, installing doors that open completely, and keeping your threshold flush. I made my 800-square-foot cottage feel twice as large using these techniques, and none required major construction.
What type of flooring works best for indoor-outdoor flow in beach cottages?
Marine-grade outdoor wood or composite decking works beautifully in both spaces. I use materials that can handle moisture, sand, and salt air. Trex composite decking mimics real wood and holds up incredibly well. The key is choosing similar tones and textures for both areas rather than trying to match them exactly.
How do I protect outdoor furniture from coastal weather?
Choose furniture made from teak, marine-grade aluminum, or all-weather wicker. I avoid tight upholstery that traps sand and opt for removable, washable slipcovers instead. Storage ottomans and benches let me quickly tuck away cushions when weather turns. Neutral colors like sandy beige and soft blue also hide salt residue better than pure white.
Can I really use my outdoor space year-round at the beach?
Absolutely! I installed a retractable awning for sun and rain protection, added outdoor curtains for wind barriers, and included a patio heater for cooler evenings. My book club met on my covered deck during a rainstorm last month, and everyone stayed perfectly comfortable. Weather-adaptable features turn seasonal spaces into year-round living areas.
What furniture works both indoors and outdoors in a beach cottage?
Look for lightweight pieces with wheels or furniture you can easily move. Expanding tables, stackable chairs, and nesting ottomans are game-changers. I made a storage ottoman from a wooden crate that works as a coffee table inside and extra seating outside. Choose materials that can handle both environments, like treated wood and outdoor-grade fabrics.
How do mirrors help make beach cottages feel more spacious?
Mirrors reflect natural light and views, creating the illusion of double the space. I hung a large mirror opposite my sliding glass doors, and it makes the ocean view appear to wrap around my living room. On my deck, glass railings preserve views instead of blocking them. Even small reflective elements like mirrored planters add to the expansive feeling.
What plants survive best in coastal indoor-outdoor spaces?
Snake plants, ZZ plants, and parlor palms thrive indoors in beach environments. Outside, I use succulents and coastal grasses that handle salt spray. The key is choosing slightly succulent varieties for both spaces. I also use matching terra cotta containers throughout to create visual continuity from inside to out.
How much does it cost to create indoor-outdoor flow in a beach cottage?
You can start with DIY projects under $300. My first threshold fix cost that much and made a huge difference. I added sail shades and homemade outdoor curtains for under $400 total. If you want to invest more, quality sliding glass door systems run around $1,500, and retractable awnings cost about the same. Start small and add features as your budget allows.
Do I need special permits to modify thresholds or add outdoor structures?
This depends on your local building codes and HOA rules. Simple cosmetic changes like painting floors or hanging curtains typically don't require permits. Installing new doors, building permanent structures, or modifying your deck might need approval. Check with your local building department before starting major projects. I always recommend verifying requirements in your specific area.